How to Use Liquid Chalk: Step-by-Step Application Guide
Applying liquid chalk takes 15 seconds and requires zero skill — once you know the technique. But small mistakes in application can undermine the product entirely: too much chalk, not enough dry time, wrong coverage areas. Here's how to get it right every time.
We've watched hundreds of gym-goers apply liquid chalk incorrectly and then blame the product. The difference between "this chalk doesn't work" and "this is the best grip I've ever had" usually comes down to three variables: amount, coverage, and patience.
Before You Apply: Prep Your Hands
Your hands need to be clean and dry before the first application. This isn't optional — it directly affects how well the chalk bonds to your skin.
If you're at the gym, wipe your palms thoroughly with a dry towel. Remove any lotion, sweat, or residue from previous exercises. Ideally, wash with soap and water and dry completely. The alcohol in liquid chalk evaporates off of dry skin within seconds. On damp or sweaty skin, the alcohol has to evaporate through a moisture layer, which takes longer and produces a weaker bond.
For subsequent applications during a workout, a quick towel wipe between sets is sufficient. You don't need to wash your hands again — you're adding a fresh layer on top of the existing chalk base, which actually improves grip over time as the layers build.
Step 1: Shake the Bottle
This step gets skipped constantly, and it's the single most common reason people get inconsistent results from the same bottle.
Liquid chalk separates during storage. The heavier magnesium carbonate particles sink to the bottom while the lighter alcohol rises to the top. If you squeeze without shaking, the first few applications will be mostly alcohol (watery, weak grip), and the last applications will be mostly paste (thick, hard to spread).
Shake vigorously for 5–10 seconds before every application. You should hear and feel the contents moving. A quick wrist flick isn't enough — you need the suspended particles to redistribute evenly throughout the liquid. Some athletes shake for a full 15 seconds on the first use of the day, when the chalk has had hours to settle.
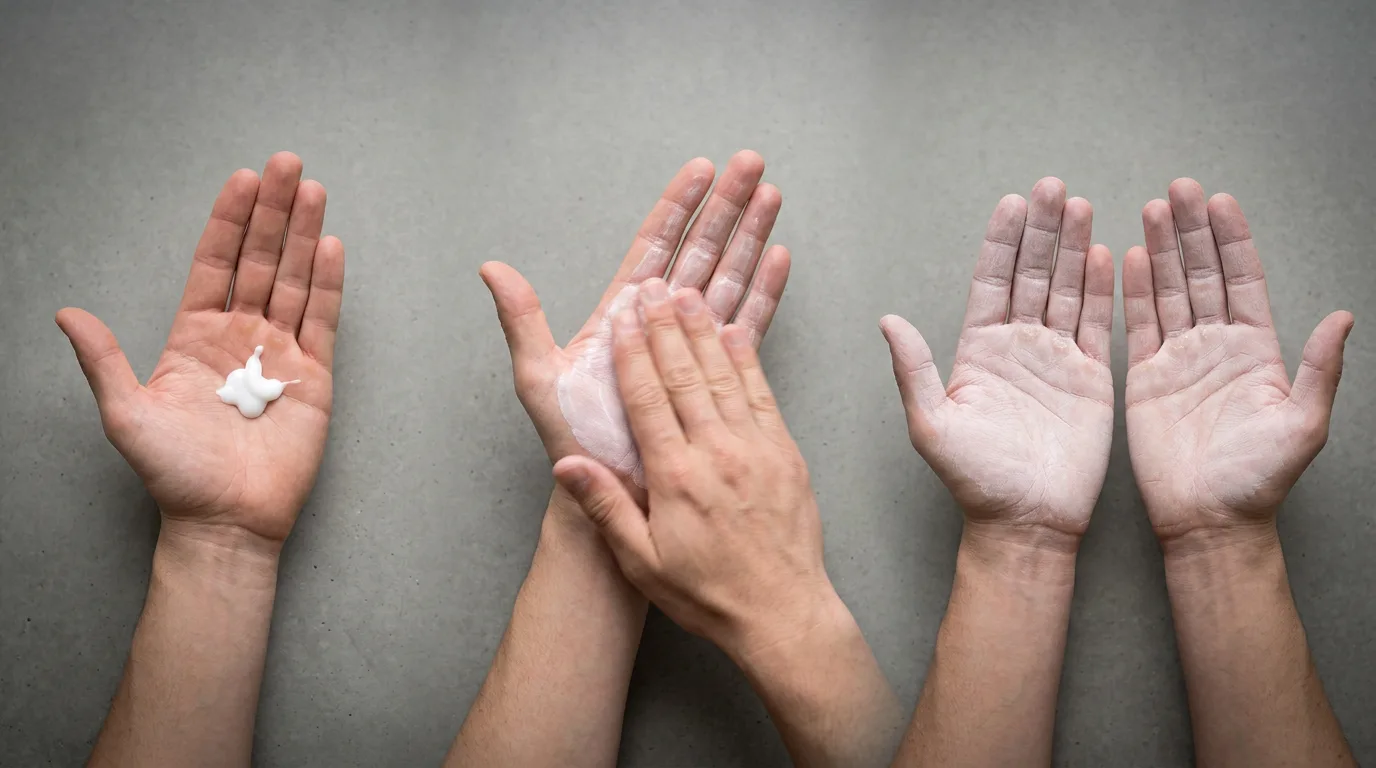
Step 2: Dispense the Right Amount
A dime-sized drop. That's it. For both hands.
Squeeze a small amount into the center of one palm — roughly the size of a US dime (17mm diameter). If you're using a thin formula, this might be a slightly larger drop because the liquid spreads more easily. For thick pastes, a slightly smaller amount is enough because the paste has higher chalk concentration per drop.
The universal mistake is over-application. A thick glob of liquid chalk does not dry evenly, takes twice as long to set, and can create a slick surface layer that actually reduces grip until it fully cures. If you can visibly see a white puddle in your palm before rubbing, you've used too much.
Step 3: Rub Your Hands Together
Press your palms together and rub in circular motions for 8–10 seconds. This step does two things: it spreads the chalk evenly across both palms, and it works the chalk into your skin's texture — the ridges, creases, and pores that create the mechanical grip surface.
Focus coverage on four key areas:
- Palm centers: The primary contact zone for barbell grips and most equipment.
- Finger pads: Essential for climbing holds, kettlebell handles, and pull-up bars.
- Finger webbing: The area between your fingers that contacts curved surfaces like barbells and dumbbells.
- First knuckle joints: These press against the bar during heavy pulls and need chalk coverage for a complete grip.
Don't spread chalk onto the backs of your hands. It wastes product and transfers to your face the next time you wipe sweat from your forehead. Keep the chalk on your gripping surfaces only.
Step 4: Wait for Full Dryness
This is where patience pays off. After rubbing, hold your hands apart and let the alcohol evaporate completely. You'll feel the transition: the initial cool, wet sensation shifts to a dry, matte texture within 10–30 seconds depending on the formula.
Thin formulas (high alcohol ratio): dry in 10–15 seconds. You can almost skip the waiting step.
Standard formulas: dry in 15–20 seconds. Count to 20 slowly.
Thick paste formulas: dry in 25–30 seconds. These need the full wait time — gripping a bar with half-dried paste creates a mess.
How to tell it's ready: rub your palms lightly together. You should feel a dry, slightly gritty texture — like fine sandpaper. If it feels smooth, cool, or tacky (in a wet way), wait another 5 seconds. If it feels chalky and dry, you're good to grip.
Step 5: Grip and Go
Grab the bar, hold, or equipment as you normally would. You should feel an immediate difference compared to bare hands — the chalk creates friction that prevents your skin from sliding on the gripping surface, even as you start to sweat.
On your first few uses, pay attention to how long the grip holds. This gives you a personal baseline for when you'll need to reapply. Everyone's sweat rate is different, and environmental factors (temperature, humidity) affect grip duration session to session.
Reapplication Strategy
Liquid chalk doesn't last forever. The coating breaks down from friction, sweat, and contact with equipment. Knowing when and how to reapply is part of using it effectively.
When to Reapply
The feel-test is simple: rub your fingertips across your palm. If you feel the dry, chalky texture, you still have coverage. If your palm feels smooth or damp, it's time for a fresh coat. Don't wait until a rep actually slips — reapply preemptively when you notice the texture fading.
How to Reapply
For mid-workout reapplication, you don't need to start from scratch. Give your palms a quick towel wipe to remove surface moisture and loose chalk, then apply a smaller amount than your initial dose — about half a dime-sized drop. Rub and wait for dryness as before. The new layer bonds to the existing chalk base, building a composite coating that's actually more grippy than a single fresh application.
Layering with Powder Chalk
For maximum grip on peak-effort lifts or send attempts, apply liquid chalk first as a base layer. Let it dry completely. Then dust your hands with powder chalk from a chalk bag or bucket. The liquid base provides consistent coverage and skin bonding, while the powder adds peak surface friction for the critical rep.
This layering technique is standard practice among competitive climbers and powerlifters. The liquid base extends the useful life of the powder layer because sweat has to work through two barriers instead of one.
Application Technique by Sport
Barbell Lifts (Deadlifts, Cleans, Snatches)
Focus coverage on the palm center and finger pads — these are the primary contact zones for overhand, mixed, and hook grips. For hook grip specifically, apply extra chalk to the thumb pad and the first two finger joints that wrap over the thumb. Hook grip creates extreme friction on the thumb, and chalk is the difference between a secure pull and a painful slip.
Pull-Ups and Bar Hangs
Extend coverage to include the finger webbing and the crease where your fingers meet your palm. During a pull-up, body weight drives your hands into the bar at this crease — and that's where calluses tear when chalk coverage is incomplete. A thin line of chalk along this crease prevents the bar from pinching skin during high-rep sets.
Climbing
Climbers need full-finger coverage because holds contact different parts of the hand depending on the grip type (crimp, open hand, pinch, jug). Apply chalk from fingertips to mid-palm. For crimps, make sure the fingertip pads and first knuckle creases are well covered. For slopers, the entire palm surface needs chalk.
Kettlebell Training
Kettlebell swings and snatches create a dynamic grip where the handle rolls across your palm. Over-chalking the palm center can actually increase callus formation by creating more friction at the rolling point. For kettlebells, focus chalk on the fingers and finger webbing while keeping the palm center lightly covered. This allows controlled handle rotation without the bar-stock grip that causes tears.
Pole Dancing
Standard liquid chalk is generally too grippy for pole dancing — it prevents the controlled slides that many moves require. Pole dancers should use specialized grip enhancers (like Chalkless products) that provide adhesion without the high-friction coating of magnesium carbonate. If using standard liquid chalk on a pole, apply a very thin layer to hands only and avoid contact with the pole surface directly.
Troubleshooting Common Application Problems
"The chalk feels slippery after drying"
You applied too much. The outer layer dried but the inner layer is still wet, creating a sliding surface. Wipe your hands clean with a dry towel and reapply a thinner coat. If this keeps happening, you may need to switch to a thicker-consistency formula that deposits more chalk per drop with less liquid carrier.
"It takes forever to dry"
Three possible causes: too much product applied, high humidity in the environment, or a thick-paste formula that inherently takes longer. In humid gyms, choose a thin formula with higher alcohol content for faster evaporation. You can also wave your hands gently (not vigorously — that wipes chalk off) to speed up the process.
"My chalk separates and the first squirt is just liquid"
You didn't shake enough. The magnesium carbonate has settled to the bottom of the bottle. Shake for a full 10 seconds — you'll feel the consistency change as the particles redistribute. Some products separate faster than others; thick pastes stay mixed longer than thin liquid formulas.
"The chalk wears off after one set"
Either the formula is too thin for your sweat level, or you're training in high humidity that breaks down the chalk faster. Switch to a thicker formula, a rosin-enhanced product, or a nano-resin compound for better moisture resistance. Also check that you're letting the chalk dry fully before gripping — half-dried chalk transfers to the bar immediately.
"My bottle is getting thick and hard to squeeze"
Alcohol has evaporated through the cap seal over time. Add 5–10 drops of isopropyl alcohol (available at any pharmacy), close the cap, and shake vigorously for 30 seconds. This rehydrates the formula. Store your bottle in a cool location and ensure the cap is sealed tight after every use to prevent future thickening.
Liquid Chalk Application Questions
How much liquid chalk should I use per application?
A dime-sized amount (roughly 0.5ml) is enough for both palms. This is one of the most common mistakes — using too much creates a thick, uneven layer that takes longer to dry and can actually reduce grip by creating a slippery surface before it fully sets.
Should I wash my hands before applying liquid chalk?
Yes, ideally. Clean, dry hands give liquid chalk the best surface to bond with. Sweat, lotion, or dirt creates a barrier between the chalk and your skin. A quick wipe with a dry towel is the minimum; washing with soap and water is optimal for the first application of a session.
Can I apply liquid chalk over powder chalk?
You can, but the reverse order works better. Apply liquid chalk first as a base layer, let it dry fully, then add powder chalk on top for peak friction on maximum-effort sets. Applying liquid over powder creates a wet, clumpy mess that takes too long to dry.
How often should I reapply during a workout?
Budget formulas need reapplication every 2–3 sets (15–20 minutes). Mid-range products last 4–6 sets (25–40 minutes). Premium formulas with rosin or nano-resins can hold through an entire 45–60 minute session. Reapply when you feel your grip start to slip — don't wait for a failed rep.
Does it matter how I rub my hands together?
Yes. Rub in circular motions covering palms, finger pads, the webbing between fingers, and the first knuckle joints. These are the primary contact points for gripping. Avoid spreading chalk onto the backs of your hands — it's wasted product and can transfer to your face when wiping sweat.
What if liquid chalk makes my hands feel slippery?
This means either the chalk hasn't finished drying (wait 5–10 more seconds) or you applied too much. A properly dried thin layer should feel dry and slightly gritty — like fine sandpaper. If it feels smooth or slick, wipe off and start over with a smaller amount.
Get Grip Tips Delivered
One email per week. Honest reviews, no spam.
Only when something changes. Unsubscribe anytime.